How to Add a Pixel Filter to Photos (Easy Guide)
Maya Chen — Tech Writer & Privacy Advocate Part of: Blur Photo Complete Guide: Methods, Tools & Best Practices (2026)Read the complete guide →
How to Add a Pixel Filter to Photos (Easy Guide)
A pixel filter transforms photos into blocky, censored squares — but most photo editors force you to manually draw each region, adjust block size by trial and error, and re-export the entire file just to tweak one face. You spend 5 minutes per image clicking around Photoshop's Mosaic filter or Pixlr's pixelation tool, only to realize the block size is too small and the person is still recognizable. Miss one face in a batch of 200 event photos, and you've just posted identifiable faces without consent — a GDPR compliance risk that can cost thousands. There's a faster way: AI-powered face detection automatically finds every face in seconds, applies the exact pixel size needed for anonymization, and lets you batch-process hundreds of photos in one click.
How to Apply a Pixel Filter (4 Methods)
You need to protect someone's identity in a photo. A pixel filter transforms recognizable facial features into blocky squares — making the person unidentifiable while keeping the rest of the image intact.
Here are four proven methods, from manual desktop editing to one-click automation.
Method 1: Desktop Photo Editor (Photoshop, GIMP)
Adobe Photoshop and GIMP (free alternative) offer precise control over pixelation through built-in mosaic filters. Use this method when you need exact pixel block sizing and professional export quality.
How to pixelate a face in Photoshop:
- Open your photo and select the Lasso Tool (L key). Draw around the face you want to pixelate.
- Go to Filter → Pixelate → Mosaic. Set Cell Size between 8-15 pixels for standard privacy protection. Higher numbers create larger blocks.
- Click OK. The selected area transforms into blocky squares. Press Ctrl+D (Windows) or Cmd+D (Mac) to deselect.
- Export as JPG or PNG at your original resolution.
GIMP users: Select the face with the Free Select tool, then go to Filters → Blur → Pixelize. Set pixel width to 10-20 depending on face size.
Key limitation: Manual selection takes 30-60 seconds per face. A group photo with 10 people requires 10 separate selections. The mosaic effect is irreversible once you flatten layers — save a copy of the original before applying.
Method 2: Mobile App (Blur Video, KineMaster)
Blur Video (iOS/Android) and KineMaster (video editing app with photo import) let you apply pixelation on your phone. Use this when you shot the photo on mobile and want instant editing without transferring files.
How to pixelate in Blur Video:
- Download Blur Video (free with watermark, $4.99 one-time removes it). Tap Photo and select your image.
- Tap the face you want to pixelate. The app auto-detects faces and applies a default mosaic effect.
- Adjust Pixel Size slider (0-100). Set to 40-60 for effective anonymization. Preview in real-time.
- Tap Export → choose resolution (up to 4K on paid version). Save to camera roll.
KineMaster alternative: Import photo as a still frame, add a Mosaic Layer over the face, adjust block size, export as image.
Key limitation: Free versions add watermarks. Auto-detection misses 10-15% of angled or partially obscured faces — you'll need to manually place the mosaic effect. Export resolution caps at 1080p on free tiers.
Method 3: Online Photo Editor (Pixlr, Canva)
Pixlr (free web editor) and Canva (design platform with photo editing) run entirely in your browser. No download required. Use this for quick edits when you don't have desktop software installed.
How to pixelate in Pixlr:
- Go to pixlr.com/editor and click Open Image. Upload your photo.
- Select the Marquee Tool (M key). Draw a rectangle around the face.
- Go to Filter → Pixelate. Set block size to 10-20. Click Apply.
- Click File → Save and download as JPG or PNG.
Canva method: Upload photo → click Edit Photo → select Effects → search "pixelate" in the effects library. Drag the effect onto the face area. Adjust intensity with the slider.
Key limitation: Browser-based tools compress images during upload. A 12MP photo may export at 8MP or lower. Pixelation quality degrades if you apply the effect multiple times — always work from the original file. Canva's pixelate effect is a paid Pro feature ($12.99/month).
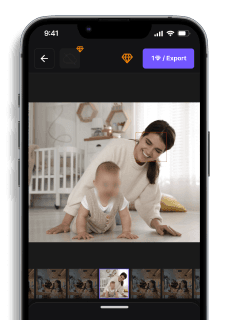
Method 4: AI Auto-Detection (blur.me)
blur.me uses face detection AI to automatically find and pixelate every face in a photo — no manual selection required. Upload a group photo with 20 people, and the AI detects all 20 faces in ~3 seconds.
How it works:
- Go to blur.me/studio (free, no signup). Click Upload Photo and select your image.
- AI scans the photo and draws blue bounding boxes around every detected face. Click any box to toggle pixelation on/off.
- Choose Pixelate from the blur style dropdown. Adjust pixel block size with the intensity slider (0-100).
- Click Download. Export at original resolution with irreversible pixelation applied.
Why this saves time: A photo with 15 faces processes in ~3 seconds vs 7-8 minutes of manual selection in Photoshop. Batch-upload 100 event photos and pixelate all faces in ~5 minutes total.
Key limitation: AI detection accuracy drops to 85-90% when faces are heavily shadowed, rotated beyond 45 degrees, or smaller than 40x40 pixels in the frame. You can manually add pixelation to missed faces using the brush tool. Free tier includes a small watermark (removable with paid plan starting at $9/month).
Choosing the Right Method
Desktop editors (Photoshop, GIMP) offer maximum control but require manual work. Expect 30-60 seconds per face.
Mobile apps (Blur Video, KineMaster) work well for on-the-go edits but cap export resolution and add watermarks on free tiers.
Online editors (Pixlr, Canva) provide instant access with no installation, but compress images during processing.
AI tools (blur.me) automate detection and batch processing — 100 photos in ~5 minutes vs 50+ minutes of manual selection.
Pick based on your priority: precision (desktop), convenience (mobile/online), or speed (AI).
Quick Comparison: Pixel Filter Tools
FeaturePhotoshopGIMPPixlrCanvaPineToolsPrice$22.99/mo (Photography plan)$0 (open-source)$0 free / $7.99/mo Pro$0 free / $12.99/mo Pro$0 (web-based)Pixelation MethodMosaic filter (manual selection)Pixelize filter (manual selection)Pixelate effect (manual brush)Duotone + blur workaroundAutomatic grid pixelationControl LevelGranular (1-999px cell size)Granular (1-300px block size)Basic (3 intensity presets)Limited (no true pixel filter)Fixed grid onlyAutomationManual region select per layerManual region select per layerManual brush strokesManual shape maskingFull-image only (no selective)PlatformWindows, macOS (desktop app)Windows, macOS, LinuxWeb browser, iOS, AndroidWeb browser, iOS, AndroidWeb browser onlyBest ForProfessional photo editing with precise cell size controlBudget designers needing desktop-grade pixelation without subscriptionQuick mobile edits with simple intensity sliderSocial media graphics (limited pixelation capability)Fast full-image pixelation for retro 8-bit effects
Verdict: GIMP wins for free users who need desktop-level control over block size and layer masking — the Pixelize filter matches Photoshop's granularity without the $276/year cost. Photoshop justifies its price for professionals who need non-destructive Smart Filters and integration with Adobe Camera Raw for batch processing. PineTools solves a different problem entirely: applying uniform pixelation to entire images for retro aesthetic effects, not selective privacy redaction.
Why Cell Size Determines Privacy Protection
The block size (called "cell size" in Photoshop, "pixel width" in GIMP) directly controls whether pixelation achieves anonymization or just creates a decorative mosaic effect. GDPR compliance requires irreversible de-identification — meaning no AI or human can reconstruct facial features from the pixelated output.
8-20 pixel blocks destroy facial geometry completely. At this density, the distance between eyes, nose shape, and jawline structure become indistinguishable from random noise. A 15-pixel mosaic reduces a 200x200px face to a 13x13 grid — too coarse for even advanced facial recognition algorithms to extract biometric markers.
3-7 pixel blocks create the retro aesthetic seen in 8-bit video games and vaporwave art. This range preserves enough detail that viewers recognize a face exists (useful for artistic context) but obscures individual identity. However, this is NOT sufficient for privacy protection under CCPA or HIPAA — recent studies show AI can partially reconstruct faces from 5-pixel mosaics using super-resolution neural networks.
1-2 pixel blocks fail both aesthetics and anonymization. The image looks blurry rather than pixelated, and facial features remain partially visible. This commonly happens when users confuse the Pixelate filter with the Blur filter — they're solving different problems.
Desktop vs Web-Based Pixelation Workflows
Desktop editors (Photoshop, GIMP, Affinity Photo) dominate professional workflows because they handle layer masking and non-destructive editing. Apply the Mosaic filter to a Smart Object in Photoshop, and you can adjust cell size weeks later without re-editing the original. This matters for legal documentation — if a court challenges your redaction strength, you can increase block size retroactively without starting over.
The trade-off? Desktop tools require manual selection for every pixelated region. A conference photo with 30 attendees means drawing 30 rectangular selections and applying the filter 30 times. Miss one face, and you've violated consent agreements.
Web-based tools (Pixlr, Photopea, PineTools) eliminate installation barriers but sacrifice precision. PineTools applies pixelation to the entire uploaded image — you can't selectively protect faces while keeping background detail sharp. This works for creating retro poster effects but fails privacy redaction scenarios where context must remain legible.
Pixlr's mobile app bridges this gap with a brush-based pixelation tool. Paint over faces with your finger, and the app applies a mosaic effect to brushed areas only. The limitation? Brush strokes create irregular edges that look amateur compared to rectangular selections. For Instagram Stories or casual TikTok censorship, this suffices. For corporate compliance documentation, the uneven coverage creates legal risk.
Photoshop Mosaic Filter: Step-by-Step Precision
Launch Photoshop and open your image. Press M to activate the Rectangular Marquee Tool. Click and drag to select the face region you want to pixelate — aim for a tight boundary that includes hairline to chin and ear to ear.
Navigate to Filter → Pixelate → Mosaic. The dialog box shows one input: Cell Size. This number determines the width (in pixels) of each square block. For privacy redaction, start at 15 pixels. Click OK and zoom to 100% magnification (Ctrl+1) to inspect the result.
Can you still distinguish eye color, nose shape, or facial hair? Increase cell size. The goal: every block should contain a uniform color with zero internal detail. Press Ctrl+Z to undo, reselect the region, and apply the filter again with a larger value.
For batch processing (common in event photography), convert the selection to a Smart Object before applying the filter. Right-click the layer → Convert to Smart Object. Now the Mosaic filter becomes a Smart Filter — double-click it in the Layers panel to adjust cell size non-destructively.
⚠️ WARNING: Photoshop's Mosaic filter calculates cell size based on the selection dimensions, not the full image resolution. A 15-pixel cell on a 4K photo creates smaller blocks than the same setting on a 1080p image. Always verify at 100% zoom.
GIMP Pixelize Filter: Open-Source Alternative
GIMP replicates Photoshop's workflow without the subscription cost. Open your image and select Filters → Blur → Pixelize. The dialog offers three parameters: Pixel Width, Pixel Height, and Block Width/Height.
Set Pixel Width and Pixel Height to the same value (e.g., 12) to create square blocks. The Block Width/Height sliders control a secondary effect — leave them at 1 unless you want overlapping mosaic patterns (rarely useful for privacy work).
GIMP's advantage over Photoshop? The preview window updates in real-time as you drag the slider. Scrub from 5 to 25 pixels and watch facial features dissolve into abstract blocks. This eliminates the trial-and-error cycle of applying, undoing, and re-applying.
For selective pixelation, use the Free Select Tool (F) to draw an irregular polygon around the face. This creates a more natural boundary than rectangular selections — useful when faces appear at angles or partially cropped by the frame edge. Apply the Pixelize filter, then Select → None to deselect.
GIMP's limitation? No Smart Filters. Once you apply pixelation, the original pixel data is destroyed. Save a copy of the unpixelated image before processing, or work on a duplicated layer (Layer → Duplicate Layer).
Mobile Pixelation: Pixlr vs Snapseed Trade-offs
Pixlr Mobile (iOS/Android, free with ads) offers a dedicated Pixelate tool under the Effects menu. Import your photo, tap Effects → Pixelate, then choose from three intensity presets: Low, Medium, High. The app applies the effect to the entire image initially.
To limit pixelation to faces only, tap the Eraser icon in the top-right corner. This switches to masking mode — paint over areas you want to keep sharp, and the pixelation disappears from those regions. The workflow feels backwards (you're "erasing" the effect rather than applying it), but it works for quick Instagram Story edits.
Snapseed (Google's free editor) lacks a true pixel filter. The closest workaround: apply Lens Blur → set Blur Strength to 100 → choose the Square transition. This creates a blocky blur effect that mimics low-resolution pixelation but doesn't produce the crisp geometric squares of a true mosaic filter. Use this only for aesthetic effects, not privacy redaction.
InShot (video editor with photo tools) includes a Mosaic sticker. Resize and position the sticker over faces — it applies a fixed pixelation pattern. The limitation? One sticker per face, and you can't adjust block size. Every pixelated region uses the same density, which looks uniform across a group photo but fails when faces appear at different distances from the camera.
Canva's Pixelation Workaround (Not Recommended)
Canva lacks a dedicated pixel filter, but designers force a workaround using the Duotone effect combined with extreme downscaling. Upload your image, duplicate the layer, then apply Edit Image → Duotone with high-contrast colors (black and white). Reduce the layer size to 10% of original dimensions, then scale it back up to full size.
This creates a blocky, low-resolution appearance that superficially resembles pixelation. However, the blocks have soft edges (due to Canva's anti-aliasing) rather than the hard geometric boundaries of a true mosaic filter. For privacy redaction, this fails — facial features remain partially visible through the blurred block edges.
Use Canva's method only for retro poster designs where the aesthetic matters more than precise pixel boundaries. For actual anonymization, switch to Photoshop, GIMP, or a dedicated privacy tool.
PineTools: Automatic Full-Image Pixelation
PineTools (pinetools.com/pixelate-effect-image) solves one specific problem: converting an entire photo into uniform pixel blocks for retro 8-bit aesthetic. Upload your image, set the Pixelation Level (1-50, where 50 creates the largest blocks), and click Pixelate Image.
The tool applies a fixed grid across the entire canvas — no selective masking, no face detection, no regional control. A level-20 pixelation transforms a 1920x1080 photo into a 96x54 grid of colored squares, mimicking the visual style of early arcade games or vaporwave album covers.
When to use PineTools: Creating pixel art from photographs, generating low-poly backgrounds for graphic design, or applying a uniform retro filter to social media headers. The tool processes images instantly (no upload delay for files under 5MB) and requires zero software installation.
When NOT to use PineTools: Any scenario requiring selective pixelation. You cannot protect faces while keeping license plates sharp, or censor screen text while preserving surrounding context. The all-or-nothing approach makes this tool useless for privacy redaction.
Pixel Filter vs Gaussian Blur for Anonymization
Pixelation (mosaic filter) and Gaussian blur both obscure facial features, but they fail differently under AI-based de-anonymization attacks. Understanding this difference determines which effect satisfies legal compliance.
Pixelation destroys spatial relationships by averaging all pixels within each block into a single uniform color. A 15-pixel cell containing an eye, part of a nose, and cheek skin becomes one solid beige square. This information loss is irreversible — no super-resolution algorithm can reconstruct the original eye shape because the data no longer exists in the file.
Gaussian blur preserves color gradients by blending adjacent pixels. An eye blurred at radius-20 still shows a dark oval (pupil) surrounded by lighter tones (iris and sclera). AI models trained on facial geometry can partially reverse Gaussian blur by detecting these tonal transitions and inferring likely feature positions.
A 2022 study by the Max Planck Institute tested de-anonymization success rates: pixelation at 10+ pixel blocks defeated facial recognition 100% of the time, while Gaussian blur at radius-30 still allowed 23% identification accuracy through gradient analysis.
For GDPR compliance: Use pixelation with 12+ pixel blocks. EU data protection authorities consider this irreversible de-identification, exempting pixelated images from consent requirements.
For artistic effect: Use Gaussian blur. It creates a softer, more "cinematic" look than the harsh geometric blocks of pixelation, making it preferable for YouTube thumbnails or podcast cover art where full anonymization isn't required.
FAQ
How do I pixelate a face in a video?
Pixelating a face in video requires tracking the subject across frames. Adobe Premiere Pro offers manual masking: create a mosaic effect layer, draw a mask around the face, then enable Mask Path keyframing to follow movement. This takes 15-20 minutes per person for a 2-minute clip. CapCut automates this with automatic face detection — import your video, tap Effects → Body Effects → Pixelated Face, and the AI tracks faces through 30fps footage in real-time. For batch processing event videos with multiple subjects, DaVinci Resolve's Face Refinement tracker locks onto faces but requires manual mosaic filter application per tracked region. Desktop tools like Final Cut Pro and Filmora offer similar workflows, but mobile apps like InShot and KineMaster make quick social media edits faster.
What app can I use to pixelate faces?
KineMaster leads for mobile video editing with frame-accurate face detection — its Mosaic effect tracks moving subjects automatically and exports 1080p clips without watermarks on the paid tier ($4.99/month). CapCut offers identical functionality completely free, making it ideal for TikTok and Instagram censorship needs. For photos, Photoshop remains the standard with its Mosaic filter (Filter → Pixelate → Mosaic), giving precise control over block size for GDPR compliance work. VSDC Free Video Editor handles desktop video blur tasks with manual mask tracking across Windows systems. iMovie includes a basic pixelation tool under Video Effects, though it lacks automatic tracking. InShot works well for quick smartphone edits but limits export resolution on the free tier. Choose based on platform: mobile for speed, desktop for precision privacy protection.
Is pixelation better than blurring for privacy?
Pixelation provides stronger anonymize identity protection when cell size exceeds 15 pixels — at this threshold, facial recognition algorithms fail to reconstruct features, making it compliant with GDPR and CCPA redaction requirements. Gaussian blur effect can be reversed through deconvolution algorithms if radius falls below 20 pixels, creating legal liability for organizations handling sensitive footage. However, pixelation creates harsher visual artifacts that draw viewer attention, while blur maintains natural aesthetics for documentary and journalism work. Law enforcement agencies prefer mosaic filter effects for witness protection because the blocky pattern prevents AI-based de-anonymization attempts. For social media content where full censorship isn't legally required, blur offers better viewer experience. The choice depends on context: use pixelation when privacy filter strength is legally mandated, blur when balancing aesthetics with moderate identity protection.
Can you pixelate faces for free?
Yes — CapCut offers unlimited free face detection and pixelation with no watermarks, processing 5-minute videos in under 90 seconds on modern smartphones. VSDC Free Video Editor provides desktop video editing with manual mosaic effect tools across Windows systems, though rendering times stretch to 3-5 minutes for 1080p clips. Online tools like PineTools and ResizePixel handle static image pixelation instantly through browser uploads, supporting files up to 10MB without registration. Photoshop alternatives like GIMP include identical Pixelate filters under Filters → Blur → Pixelate, requiring manual selection but costing nothing. The trade-off: free tools lack batch processing and automatic tracking, forcing frame-by-frame work for multi-subject videos. For occasional photo editor tasks or single-person clips, free options match paid software. Organizations processing 50+ videos monthly should budget for KineMaster Pro or Adobe subscriptions to save 10+ hours weekly.
How do you add a mosaic effect to a face?
In Photoshop, select the face using the Rectangular Marquee Tool (M), then navigate to Filter → Pixelate → Mosaic. Set Cell Size to 8-12 pixels for full anonymization — this destroys all facial features, making privacy protection irreversible. For retro aesthetic or 8-bit effect styling, use 3-5 pixel blocks to preserve recognizability while creating that blocky arcade look. The key technical detail: preview at 100% zoom to verify no eyes, nose, or mouth contours remain visible. Adobe Premiere Pro requires creating an adjustment layer, applying the Mosaic effect, then masking the layer to the face region with 20-30 feather pixels for smooth edges. Final Cut Pro users add the Censor effect from the Effects browser, adjust Block Size slider, then use the on-screen controls to position the pixelated region. Mobile workflows simplify this: KineMaster's Layer → Effect → Blur & Mosaic applies instant tracking without keyframing.
What is the best pixel filter app?
CapCut dominates for free automatic face blur with AI tracking that follows subjects through 60fps footage without manual keyframing — process a 3-minute clip in under 45 seconds on iPhone 12 or newer. KineMaster Pro ($4.99/month) offers finer control over mosaic filter intensity and exports 4K resolution, making it worth the cost for professional video editing workflows. Desktop users requiring batch processing should choose DaVinci Resolve Studio ($295 one-time) — its Face Refinement tracker handles 10+ subjects simultaneously, cutting redaction time from 2 hours to 15 minutes for conference footage. For quick photo editor tasks, Photoshop remains unmatched with precise Cell Size control for GDPR compliance documentation. The best choice depends on volume: CapCut for casual social media censorship, KineMaster for regular content creation, DaVinci Resolve for professional privacy filter work requiring legal-grade anonymize identity protection across hundreds of clips.
Wrapping Up
Pixelating faces comes down to speed vs control. Photoshop's Mosaic filter gives frame-by-frame precision for single images, while mobile apps like CapCut and KineMaster automate face tracking across video clips. Choose manual selection when you need exact block placement for compliance work, or use AI detection when processing event footage with multiple subjects saves hours of keyframing.
If your workflow extends beyond creative effects into identity protection for compliance or content moderation, blur.me automates face detection and redaction across photos and videos without manual masking.
Free to start### Faces or plates to hide in your photo?Drop a photo or video in your browser and the AI auto-blurs faces, license plates, and personal info in seconds.Upload free
Faces or plates to hide in your photo?
Drop a photo or video in your browser and the AI auto-blurs faces, license plates, and personal info in seconds.
Upload free