Add Video Blur to Any Video Online – Easy, Fast, and Free
Maya Chen — Tech Writer & Privacy Advocate Part of: Blur Video Complete Guide: Tools, Methods & Best Practices (2026)Read the complete guide →
Video blurring is one of the most effective ways to hide faces, license plates, or sensitive details without losing video quality. Using an online blur tool like BlurMe makes the process effortless. Instead of installing complicated desktop software, you can blur videos online directly from your browser. In this guide, we’ll show you exactly how to blur a video online using BlurMe Face Blur, plus practical tips for different use cases like blurring parts of videos, applying background blur, and protecting private information in your footage.
Faces or plates to blur in your video?
Upload and the AI blurs them automatically in seconds.
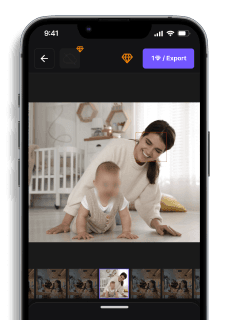
How to Blur a Video Online with BlurMe
Follow this simple step-by-step guide to use BlurMe’s online blur tool:### Step 1: Go to BlurMe StudioOpen your browser and visit BlurMe Studio. You don’t need to install anything, everything happens online.### Step 2: Upload Your VideoClick “Upload Video” and choose the file you want to edit. BlurMe supports popular formats like MP4, MOV, and AVI.### Step 3: Select AI Blur ModeOnce uploaded, choose Enable AI Blur. The tool automatically detects all faces, people, cars, and license plates in your video.### Step 4: Adjust or Select Areas to BlurBlurMe will instantly mark detected faces and objects. You can:Select specific areas to blur or unblur (e.g., a person’s face, a license plate).Adjust the blur intensity for a stronger or softer effect.Use the Custom Blur selection tool to blur a part of the video manually if needed.### Step 5: Apply and ExportPreview your blurred video. When satisfied, click Export to download the finished file. Your video blur will be applied smoothly across frames with no lag.
Common Approaches to Video Blur
You have three main paths: browser-based tools, desktop editing software, and mobile apps. Each method trades convenience for control — the fastest option isn't always the most precise.
AI-Powered Browser Tools (Fastest Path)
blur.me and similar AI tools detect faces automatically. Upload your footage, and the AI tracks every face across all frames in seconds. No keyframing, no manual masking.
Here's how it works with blur.me:
Step 1: Upload Your Clip
Drag your MP4 file (up to 5GB) into the browser at https://video.blur.me. The upload typically takes 30-60 seconds for a 5-minute video.
💡 TIP: MP4 files process 20% faster than MOV — convert before uploading if you're working with iPhone footage.
Step 2: Enable AI Blur
Click "Auto-detect Faces" in the toolbar. Blue bounding boxes appear around every detected face within 3-5 seconds. The AI tracks these faces automatically across all frames.
💡 TIP: AI auto-detection saves 90% of manual masking time compared to frame-by-frame editing in traditional video editors.
Step 3: Adjust Blur Intensity
Drag the blur radius slider (0-100) while the video plays in real-time preview. Higher values = stronger blur effect, but anything above 60 can look unnatural.
💡 TIP: For GDPR compliance workflows, use intensity 50+ to ensure faces are fully unrecognizable. Test with a screenshot before exporting.
Step 4: Export
Click "Download" — a 5-minute video renders in approximately 30 seconds. Output format matches your input (MP4 → MP4).
💡 TIP: The blur is irreversible in the final export. Original pixel data is permanently destroyed, meeting privacy protection requirements.
Key limitation: AI face detection works best on frontal faces. Profile shots, partially obscured faces, or rapid head movements can cause tracking failures. You'll need to manually add blur regions for missed detections.
Desktop Video Editing Software (Maximum Control)
DaVinci Resolve (free) and Adobe Premiere Pro (paid) give you frame-by-frame precision. You manually draw mask paths and keyframe the blur effect to follow moving objects.
Step 1: Import and Add Blur Effect
Import your clip into DaVinci Resolve. Select the clip on the timeline, then navigate to Effects > Blur > Gaussian Blur. Drag the effect onto your clip.
Step 2: Create a Power Window Mask
In the Color tab, click the circle icon to draw a circular mask around the first face. Adjust the blur radius slider (typically 30-50 for faces) until the face is unrecognizable.
⚠️ WHY THIS STEP MATTERS: Without a mask, the entire frame blurs. The mask confines the blur effect to only the face region.
Step 3: Enable Motion Tracking
Right-click the mask, select "Track Forward." DaVinci analyzes the footage and moves the mask to follow the face automatically. For a 2-minute clip, tracking takes 3-5 minutes.
💡 TIP: Tracking fails when the subject moves behind objects or turns away. Scrub through the timeline after tracking to catch failures.
Step 4: Fix Tracking Errors
When the mask drifts off the face, pause playback and manually reposition it. Add a keyframe (click the diamond icon), then continue tracking from that point.
Step 5: Repeat for Each Face
If your video has multiple people, create a separate mask for each face. A 5-person scene requires 5 masks and 5 tracking passes.
Export: File > Deliver > MP4. A 5-minute 1080p video takes 8-12 minutes to render.
Key limitation: Manual masking is time-intensive. A 30-minute dashcam clip with 10 moving faces can take 2+ hours to blur properly. Motion tracking also breaks when subjects overlap or exit the frame.
Mobile Video Blur Apps (On-the-Go Solution)
CapCut (iOS/Android, free) and KineMaster (free with watermark) let you blur faces directly on your phone. Best for short clips under 2 minutes.
Step 1: Import Footage
Open CapCut, tap "New Project," and select your video from the camera roll. The clip loads onto the timeline.
Step 2: Add Mosaic Effect
Tap "Effects" → "Video Effects" → "Mosaic." Drag the mosaic effect onto the clip. A pixelated blur covers the entire frame.
⚠️ WHY MOSAIC: CapCut's "Blur" effect is decorative (background blur for aesthetic). "Mosaic" is the privacy protection tool — it pixelates regions to obscure identities.
Step 3: Mask the Face
Tap the effect, then "Mask" → "Rectangle." Draw a box around the face. Pinch to resize, drag to reposition.
Step 4: Animate the Mask
Scrub the timeline forward 1 second. Move the mask to follow the face's new position. CapCut adds a keyframe automatically. Repeat every 1-2 seconds until the person exits the frame.
💡 TIP: For fast-moving subjects, add keyframes every 0.5 seconds. Gaps between keyframes cause the mask to lag behind the face.
Export: Tap the export icon (top-right). A 1-minute video exports in 30-60 seconds on modern phones.
Key limitation: Manual keyframing on a 6-inch screen is tedious. Videos longer than 3 minutes become impractical. KineMaster offers automatic motion tracking (Pro subscription, $4.99/month), but it still requires manual corrections for profile shots and occlusions.
All three methods deliver privacy protection, but your choice depends on volume. Blur one 30-second Instagram story? Use CapCut. Anonymize 50 hours of CCTV footage? AI tools like blur.me save days of manual work. Need surgical precision for a documentary release? DaVinci Resolve gives you frame-accurate control.
Why Add Video Blur?
Adding blur to your videos isn’t just for style, it’s for privacy, compliance, and professionalism. Here are a few common reasons to use video blur:Protect identities: Blur faces of bystanders or minors appearing in public or event footage.Hide personal information: Obscure details like license plates, ID cards, or documents.Comply with privacy regulations: Stay compliant with GDPR or data protection rules in surveillance and corporate recordings.Create cinematic effects: Apply a background blur online to draw focus to your subject or give your footage a shallow depth-of-field look.With BlurMe, all these effects can be achieved in minutes—without needing to edit manually frame by frame.
More Ways to Blur and Redact Parts of Your Video
If you’re adding a blur to your footage, you might need more targeted effects depending on what you’re trying to hide. BlurMe offers several browser-based tools that work alongside general video blurring. For example, Blur Face in Video automatically detects every face in a clip so you can blur individuals without manual masking. If you prefer a mosaic-style censor, Pixelate Video gives you a stronger privacy effect with one click. You can also blur only the surroundings using Blur Video Background, which is helpful when you want to keep your main subject clear. And for full-scene privacy automation, BlurMe’s AI Redaction Software can detect faces, plates, and screens across your footage and apply consistent redaction instantly.All of these tools integrate naturally with the core Blur Video workflow and make it easy to apply the exact type of blur your content needs.
Tips for Better Video Blur Results
Use high-resolution footage – Low-res videos can make the blur look pixelated.Let AI do the detection first – It saves time and ensures consistent tracking across frames.Combine auto and manual tools – Use manual brushing to refine tricky spots the AI might miss.Adjust blur intensity – A subtle blur looks natural for backgrounds, while stronger blur works best for hiding sensitive info.Preview before exporting – Always check that the right areas are blurred and tracking works properly.
Why Use BlurMe for Video Blur?
Here’s why BlurMe stands out among other blur video apps and editors:Fully online: No downloads or installations—works in your browser.AI-powered detection: Automatically tracks faces, vehicles, and moving objects.Free to use: Try BlurMe’s core features completely free.No watermark: Export videos without branding.Secure and private: Your files are processed temporarily and never stored permanently.BlurMe isn’t just another blur video tool—it’s built for speed, accuracy, and simplicity.
Advanced Uses of Video Blur
BlurMe isn’t limited to privacy, its video blur effects can also enhance storytelling or visual style:Create motion blur effects for action sequences.Add soft focus blur to backgrounds for an aesthetic look.Pixelate videos for a more stylized redaction effect.→ Explore: Pixelate VideoIf you’re looking for a professional-level video redaction solution, check out our roundup of the 10 Best Video Redaction Software.
Faces or plates to blur in your video?
Drop a video or photo in your browser and the AI auto-blurs faces, license plates, and personal info in seconds.
Upload free