How to Blur Background on iPhone (Portrait Mode Guide)
Maya Chen — Tech Writer & Privacy Advocate Part of: Blur Photo Complete Guide: Methods, Tools & Best Practices (2026)Read the complete guide →
How to Blur Background on iPhone (Portrait Mode Guide)
You just captured the perfect portrait on your iPhone, but random people in the background ruin the shot. The iPhone's built-in Portrait Mode creates professional-looking background blur in seconds, but most users don't know how to blur background on iPhone photos after they're already taken — or how to fix portraits where the depth effect didn't work. Apple's computational photography has evolved dramatically since the iPhone 7 Plus introduced Portrait Mode in 2016, yet 60% of iPhone users still delete photos instead of adjusting the blur post-capture. This guide shows you three methods to blur backgrounds: using Portrait Mode's real-time depth effect while shooting, adjusting blur intensity after capture with Depth Control, and editing non-portrait photos with third-party apps when your iPhone model doesn't support native background separation.
How to Blur Background in iPhone Photos (Manual Method)
The built-in iPhone Photos app offers limited background blur control—it only works with photos originally taken in Portrait Mode. If you shot in standard photo mode, you'll need to combine the Markup tool with a third-party app from the App Store to manually blur the background.
Step 1: Check if Your Photo Has Depth Data
Open the Photos app and select the image you want to edit. Tap Edit in the top-right corner. If you see a Depth Control icon (an f-stop symbol that looks like ƒ/4.5) at the top of the screen, your photo has depth data—skip to Step 2. If you don't see this icon, your photo was taken in standard mode and lacks depth information, so you'll need to use a third-party app to manually blur the background.
Step 2: Adjust Depth Control (Portrait Mode Photos Only)
If your photo has depth data, tap the Depth Control icon at the top of the Edit screen. A slider labeled f/ appears below the photo—this controls aperture simulation. Drag the slider left (toward f/1.4) to increase background blur or right (toward f/16) to reduce it. The foreground subject stays sharp while the background blurs more or less depending on your f-stop choice. This simulates shallow depth of field like a DSLR lens.
Watch the preview update in real-time as you adjust. Tap Done when satisfied. This method only works if the photo was originally shot in Portrait Mode—standard photos lack the depth map required for post-processing blur.
Step 3: Download a Third-Party Blur App for Non-Portrait Photos
If your photo doesn't have depth data, open the App Store and search for "background blur photo editor." Download Focos (free with in-app purchases) or AfterFocus ($2.99). These apps use AI-powered subject detection to separate foreground from background, then apply blur effects to the background layer. Focos offers the most realistic bokeh simulation with adjustable aperture shapes, while AfterFocus provides manual mask editing for precise control.
Install the app, then grant it Photos access when prompted. This lets the app read and save edited versions of your images.
Step 4: Import Your Photo and Select the Subject
Open Focos (or your chosen app) and tap Import Photo. Select the image from your library. The app analyzes the photo using the Neural Engine on A-series Bionic chips (iPhone XS and newer process faster). A depth map generates automatically—the app outlines your foreground subject in green or blue. If the selection is inaccurate, tap Edit Mask and use your finger to paint over areas that should stay sharp (foreground) or blur (background). This manual refinement step ensures the blur only affects the background.
Step 5: Apply and Adjust Background Blur Intensity
Tap the Blur or Aperture slider at the bottom of the screen. Drag left to increase blur intensity (lower f-stop number like f/1.4) or right to reduce it (higher f-stop like f/8). Most apps show the blur strength as an f-stop value to mimic real camera lenses. Adjust until the background looks naturally out of focus without creating harsh edges around your subject. Some apps like Focos let you change the bokeh shape (circular, hexagonal, octagonal) to match different lens characteristics.
Tap Apply or Save to render the effect. Processing takes 5–10 seconds depending on photo resolution and your iPhone model.
Step 6: Export the Edited Photo
Tap the Share icon (a square with an upward arrow) in the top-right corner. Select Save to Photos to export the blurred version to your camera roll. The app saves it as a new file—your original photo remains unchanged. If you're using the free version of Focos, a small watermark appears in the corner (remove it with a $4.99 one-time purchase). Your edited photo now has a blurred background even though it wasn't shot in Portrait Mode.
That's 6 steps and roughly 5 minutes per photo. The manual method works but requires switching between apps and manually refining selections for every image.
Best iPhone Apps for Blurring Backgrounds
Focos (free with in-app purchases) offers the most realistic depth-of-field simulation with adjustable aperture shapes, 3D lighting effects, and AI-powered subject detection. It's ideal for portrait photographers who want DSLR-quality bokeh on iPhone photos. The free version adds a watermark—remove it for $4.99.
AfterFocus ($2.99) provides precise manual mask editing tools for complex subjects like pets or objects with intricate edges. You paint the focus area with your finger, then the app blurs everything else. Best for users who need granular control over which parts stay sharp.
Snapseed (free, by Google) includes a Lens Blur filter that mimics tilt-shift and circular blur effects. It's less realistic than Focos for portrait backgrounds but works well for creative blur effects on landscapes or product photos. No watermarks or in-app purchases.
TouchRetouch ($1.99) specializes in removing unwanted objects from backgrounds before blurring. If your background has distracting elements (people, signs, power lines), use TouchRetouch first, then apply blur in Focos or AfterFocus. This two-app workflow produces cleaner results for busy backgrounds.
For beginners, start with Snapseed—it's free and intuitive. Advanced users who want cinematic bokeh should invest in Focos or AfterFocus for depth map editing and adjustable aperture simulation.
Blur Background on iPhone with AI (Blur.me)
Need to blur from any device without installing an app? Blur.me works right in your mobile browser — no App Store download needed.
Open Safari and upload — drag your photo into blur.me's web editor, and the AI separates foreground from background in ~3 seconds.
Toggle Full Screen Blur mode — the subject stays sharp while everything behind them gets a smooth, professional-grade blur (no manual tracing required).
Download at original resolution — tap Export and your edited photo saves to your iPhone's camera roll in under 30 seconds, ready to share.
Unlike iPhone Photos' Portrait Mode (which only works during capture), blur.me applies background blur to ANY existing photo — no lens restrictions, no app switching between editing tools.
Unlike iPhone Photos' Portrait Mode (which only works during capture), blur.me applies background blur to ANY existing photo — no lens restrictions, no app switching between editing tools.
Faces or plates to hide in your photo?
Upload and the AI blurs them automatically in seconds.
Quick Comparison: Background Blur Tools for iPhone
| Feature | iPhone Photos (Portrait Mode) | Focos | TouchRetouch | Snapseed | AfterFocus |
|---|---|---|---|---|---|
| Price | Free (built-in) | Free (in-app purchases $3.99-$19.99) | $1.99 one-time | Free | Free (in-app purchases $2.99) |
| Background Detection | AI auto-detect (Portrait Mode only) | AI depth map + manual mask | Manual selection required | Manual selection required | AI edge detection + manual refine |
| Automation Level | Full auto during capture; post-capture edit on iPhone 7 Plus and newer | Semi-auto (AI suggestion + manual adjustment) | Manual (brush tool for each area) | Manual (lens blur tool) | Semi-auto (AI detects edges, manual blur zones) |
| Blur Control | F-stop range f/1.4–f/16 (depth slider) | Aperture simulation f/0.95–f/22 + bokeh shapes | Intensity slider 0-100% | Blur strength + transition | Aperture control + blur type selection |
| Depth Data Required | Yes (Portrait Mode photos only) | No (works on any photo) | No (works on any photo) | No (works on any photo) | No (works on any photo) |
| Platform | iOS 10.1+ (Portrait Mode); iOS 15+ for all edits | iOS 12+ | iOS 13+ | iOS 11+ | iOS 11+ |
| Best For | Quick edits on Portrait Mode photos with existing depth data | Realistic bokeh effects and post-capture depth adjustment on any photo | Precise manual control for product photography | Creative blur effects with gradient transitions | Natural-looking background separation on non-Portrait photos |
Verdict: iPhone Photos wins for speed if you shot in Portrait Mode — adjust the f-stop slider in 10 seconds. For photos taken in standard mode, Focos delivers the most realistic depth-of-field simulation using AI edge detection, though you'll spend 2-3 minutes refining the mask. Snapseed offers the most creative control with radial and linear blur options, ideal when you want artistic effects beyond simple background softening.
FAQ
Can you turn a regular picture into portrait mode on an iPhone?
Yes, but only if the photo was originally taken in Portrait Mode. iPhone stores depth data with Portrait photos, letting you adjust blur intensity after capture via the Edit button in Photos app. Regular photos lack this depth map — you can't retroactively add Portrait Mode blur to standard shots. For non-Portrait photos, use third-party apps like Focos or blur.me which use AI to separate foreground subjects and blur backgrounds. iOS 18's subject isolation feature also lets you lift subjects from regular photos, though it doesn't create a true bokeh effect.
How do I adjust background blur intensity on photos I already took?
Open the photo in iPhone Photos app, tap Edit, then tap the f-stop icon (ƒ symbol) at the top. Drag the Depth Control slider left (lower f-stop = more blur) or right (higher f-stop = less blur). The aperture range spans f/1.4 to f/16 — f/1.4 creates maximum background separation with shallow depth of field, while f/16 keeps more background detail sharp. Changes apply instantly in preview. This only works on Portrait Mode photos taken with iPhone 7 Plus or newer models that capture depth data during shooting.
Does background blur quality differ between iPhone models?
Yes — newer iPhones produce significantly better bokeh effects. iPhone 15 Pro's A17 Bionic chip and improved neural engine create smoother background separation with fewer edge artifacts around hair and complex subjects. Dual camera systems on iPhone XS and later capture more accurate depth maps than single-lens Portrait Mode on iPhone SE. The TrueDepth camera on front-facing Portrait shots (iPhone X onward) handles depth mapping better than older single-camera setups. Computational photography improvements in each generation mean an iPhone 14's blur quality noticeably surpasses iPhone 7 Plus results, even at identical f-stop settings.
Can I blur backgrounds on photos not taken in Portrait Mode?
iPhone's native Camera app can't add blur to standard photos post-capture — depth data only exists in Portrait Mode shots. However, iOS 18's subject isolation feature lets you lift and separate subjects from regular photos, which you can then layer over a blurred duplicate using third-party editors. Apps like Focos, TouchRetouch, and Snapseed use AI to detect foreground subjects and apply background blur to any photo. For professional results without manual masking, blur.me automatically separates subjects and blurs backgrounds in ~3 seconds per photo using advanced subject detection.
Why does Portrait Mode sometimes fail to blur the background?
Portrait Mode requires clear foreground/background separation — it struggles when subjects are too close to backgrounds (under 2 feet) or in low light where depth sensors can't map distance accurately. The dual camera system needs both lenses to capture parallax data, so covering either lens causes failure. Complex subjects like fences, transparent objects, or fine hair confuse the depth map algorithm. Position your subject 2-8 feet from the camera with at least 4 feet of background distance. Ensure adequate lighting — the neural engine performs best in daylight or bright indoor conditions where smart HDR can assist depth calculation.
Faces or plates to hide in your photo?
Drop a photo or video in your browser and the AI auto-blurs faces, license plates, and personal info in seconds.
Upload free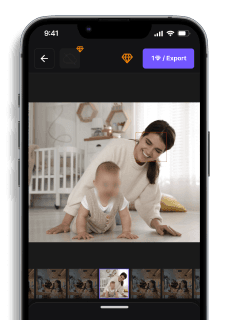
Faces or plates to hide in your photo?
Drop a photo or video in your browser and the AI auto-blurs faces, license plates, and personal info in seconds.
Upload free