How to Blur Background on iPhone (Easy Photo Guide)
Maya Chen — Tech Writer & Privacy Advocate Part of: Blur Photo Complete Guide: Methods, Tools & Best Practices (2026)Read the complete guide →
How to Blur Background on iPhone (Portrait Mode Guide)
You just shot the perfect photo of your partner at a London café, but the cluttered background ruins the shot. iPhone's Portrait mode can blur backgrounds instantly, but most UK users don't know how to blur background on iPhone UK after the photo is taken — or how to fix portraits where the depth effect failed. Adjusting blur intensity takes 6 manual steps and 5 minutes if you don't know the right iOS Photos app controls. Apple's computational photography hides powerful depth control tools that let you change the f-stop, adjust focus and depth, and even add studio light effects to existing photos. This guide shows you three methods to blur backgrounds on iPhone — from the built-in Portrait mode and depth effect editor to third-party apps that work on older models without dual cameras.
How to Blur Background on iPhone Using Photos App (Manual Method)
iPhone's built-in Photos app offers Portrait Mode for background blur, but it only works during capture — not on existing photos. For photos already taken without Portrait Mode, you'll need a two-step process: iOS Photos Markup for basic edits plus a third-party blur app from the App Store for the actual background separation.
Step 1: Open Your Photo in the Photos App
Launch the Photos app and navigate to the image you want to edit. Tap the photo to view it full-screen, then tap Edit in the top-right corner. This opens iOS's native editing interface where you can access basic adjustments like exposure, contrast, and cropping. You need to be in Edit mode to access the Markup tools, which you'll use to mark your subject area before moving to a blur app.
Step 2: Use Markup to Outline Your Subject
Tap the three-dot menu (•••) in the top-right corner, then select Markup from the dropdown. This activates drawing tools at the bottom of the screen. Choose the pen tool and trace around your subject — the person or object you want to keep sharp. Draw loosely; you're creating a reference boundary, not a precise mask. This outline helps you visualize the separation between foreground and background before applying blur in a dedicated app.
Step 3: Save and Export to a Blur App
Tap Done to save your Markup outline, then tap the share icon (box with upward arrow) at the bottom-left. Scroll through the app row and select a blur app like Snapseed (free), Focos (free with in-app purchases), or TouchRetouch (paid). If you don't see your blur app, tap More and enable it in the share sheet settings. The photo exports to the selected app, preserving your Markup outline as a visual guide.
Step 4: Apply Background Blur in the Third-Party App
In your blur app, locate the background blur or depth effect tool — in Snapseed, it's under Tools > Lens Blur; in Focos, it's the Aperture slider on the main screen. Tap to place a focus point on your subject (the area you outlined in Markup). The app uses AI to separate foreground from background, then applies gaussian blur to everything behind your subject. Adjust the blur intensity slider — labeled as f-stop in Focos or strength in Snapseed — until the background looks naturally out of focus.
Step 5: Refine Edge Detection and Save
Most blur apps let you manually adjust the edge mask where foreground meets background. In Focos, tap Mask to view the depth map — white areas stay sharp, black areas blur. Use the brush tool to paint corrections if the AI misidentified hair, glasses, or small objects as background. In Snapseed, pinch to zoom and check edges carefully; the app doesn't show a mask, so you'll need to undo and reapply if edges look wrong. Once satisfied, tap Export or Save to write the blurred photo back to your Photos library.
Step 6: Compare Before and After
Return to the Photos app and open your newly saved image. Swipe left to view the original (with Markup outline) and right to view the blurred version. Check for edge artifacts — look for halo effects around hair, unnatural blur transitions, or parts of your subject that accidentally got blurred. If you spot issues, reopen the blur app and adjust the mask or reduce blur intensity. Delete the failed version to avoid clutter.
That's 6 steps and roughly 5 minutes for a single photo. The workflow requires switching between two apps, manually tracing your subject, and iterating on edge masks — tedious for batch jobs or photos with complex backgrounds like foliage or chain-link fences.
Best iPhone Apps for Blurring Backgrounds
Focos (free, in-app purchases for advanced features) — Uses dual-camera depth data on iPhone 13 and newer to create realistic bokeh with adjustable aperture from f/1.4 to f/16. Best for portrait photos where you want studio-quality background blur with accurate edge detection around hair and glasses. The free version watermarks exports; $8/month removes it.
Snapseed (free, no ads) — Google's all-in-one photo editor includes a Lens Blur tool that simulates shallow depth of field on any photo, even from single-lens iPhones. You manually place a focus point and adjust blur strength, transition, and vignette intensity. Best for beginners who want a simple blur effect without learning complex masking tools. Edge detection is less precise than Focos but requires no subscription.
TouchRetouch ($2.99, one-time purchase) — Primarily a object-removal tool, but its Blur brush lets you paint background blur selectively. You control exactly which areas blur by drawing over them, avoiding AI guesswork. Best for photos with messy backgrounds (crowds, signage, clutter) where you want surgical control over what stays sharp. No monthly fees, but the manual approach takes longer than AI-powered apps.
AfterFocus (free, $0.99 for pro features) — Focuses on creating DSLR-style bokeh effects with customizable blur shapes (circular, hexagonal) and highlight rendering. You draw a rough outline around your subject, and the app fills in the rest using edge detection. Best for creative blur effects rather than natural depth-of-field simulation. The free version limits export resolution to 1080p; pro unlocks full resolution and removes ads.
For quick edits on photos already taken, Snapseed offers the fastest workflow. For portrait shots where you want professional-grade bokeh with accurate hair separation, Focos justifies the subscription if you edit frequently. If you only need occasional background blur and want to avoid subscriptions, TouchRetouch provides permanent access for $3.
Blur Background on iPhone with AI (Blur.me)
Need to blur from any device without installing an app? Blur.me works right in your mobile browser — no App Store download, no switching between tools.
Open blur.me in Safari — tap the upload button and select your photo from your iPhone gallery. The AI separates your subject from the background in ~3 seconds.
Adjust blur intensity — drag the slider from 0 to 100 while previewing the effect in real-time. The foreground stays sharp, everything else smooths out.
Export at original quality — download the blurred photo straight to your iPhone Photos app. No resolution loss, no watermark.
Try it free today and give your photos that perfect professional finish.
When Portrait mode isn't available or produces inconsistent results, you need a tool that works on any photo — even ones taken years ago. Blur.me's AI separates your subject from the background in ~3 seconds, letting you add that professional depth-of-field effect to any iPhone photo without switching apps or losing quality.
Faces or plates to hide in your photo?
Upload and the AI blurs them automatically in seconds.
Quick Comparison: How to Blur Background on iPhone Tools
| Feature | iPhone Photos (Portrait Mode) | Focos | TouchRetouch | Snapseed | AfterFocus |
|---|---|---|---|---|---|
| Price | Free (built-in) | Free + £4.99/mo Pro | £2.99 one-time | Free | Free + £3.99 Pro |
| Background Detection | AI auto (dual camera required) | AI depth map + manual refine | Manual brush selection | Manual mask tools | AI edge detection + manual |
| Blur Intensity Control | f/1.4–f/16 aperture slider | f/1.4–f/22 + bokeh shapes | Opacity 0–100% | Lens Blur 0–100 | 3 blur levels + custom |
| Depth Map Editing | Yes (Focus and Depth tool) | Advanced depth editing | No depth data | No depth data | Basic depth simulation |
| Works on Existing Photos | Portrait mode photos only | Any photo (creates depth map) | Any photo | Any photo | Any photo |
| iOS Version Required | iOS 12+ (Portrait mode: iOS 10.1+) | iOS 15+ | iOS 14+ | iOS 13+ | iOS 12+ |
| Processing Time | Instant (real-time preview) | ~5 sec per photo | ~30 sec (manual selection) | ~20 sec (mask + blur) | ~10 sec |
| Platform | iPhone only | iPhone/iPad | iPhone/iPad | iPhone/iPad/Android | iPhone/iPad/Android |
| Best For | Quick portraits with dual-camera iPhones | Professional bokeh effects and aperture simulation | Precise manual background removal | Creative blur effects with masking | Social media posts with artistic blur |
iPhone Photos Portrait Mode works best if you have iPhone 7 Plus or newer with dual cameras — free and instant, but locked to photos taken in Portrait mode. Focos (£4.99/mo Pro) gives you the most control with f/22 aperture simulation and custom bokeh shapes, justifying the cost for professional-looking results. Snapseed offers the best free alternative for any photo, though you'll spend 20 seconds masking the subject manually instead of relying on AI depth detection.
FAQ
How to blur the background of a photo already taken on Apple?
Open the photo in the iPhone Photos app and tap Edit. If the image was shot in Portrait Mode, tap the f-stop icon at the top left to access Depth Control. Drag the aperture slider left (lower f-stop = more blur) or right (higher f-stop = less blur). The blur intensity adjusts in real-time as you move the slider. Tap Done to save. This works on any iPhone with dual cameras or TrueDepth camera running iOS 11 or later.
Does iPhone Portrait Mode work on all iPhone models?
Portrait Mode requires dual cameras (iPhone 7 Plus, 8 Plus, X, XS, XR, 11-15 series) or TrueDepth camera (iPhone X and newer). Single-camera models like iPhone SE (2nd/3rd gen) support Portrait Mode only for people, not objects. Older iPhones (6s, 7, SE 1st gen) lack hardware support — use third-party apps like Blur.me or Snapseed instead. iOS 18 enhanced computational photography on iPhone 14 Pro and 15 series with improved edge detection around hair and glasses.
Can I adjust blur intensity after taking a Portrait photo?
Yes. Open the Portrait photo in Photos app, tap Edit, then tap the f/number icon (top left). Drag the slider from f/1.4 (maximum blur) to f/16 (minimal blur). The depth map captured during shooting lets iOS recalculate background blur non-destructively. This feature requires iOS 12.1+ and works on photos taken with dual-camera or TrueDepth iPhones. You can re-edit depth control unlimited times without quality loss.
What's the difference between Portrait Mode and Cinematic Mode for background blur?
Portrait Mode blurs backgrounds in still photos using depth mapping. Cinematic Mode (iPhone 13+, iOS 15+) blurs backgrounds in video with rack focus transitions — the focus shifts automatically when a new subject enters the frame. Portrait Mode processes one depth map per photo (~3 seconds). Cinematic Mode tracks depth across 30 frames per second in real-time. Both use the Neural Engine for subject segmentation, but Cinematic requires A15 Bionic chip or newer.
Why does Portrait Mode sometimes fail to blur the background on my iPhone?
Portrait Mode needs 8 feet maximum distance to the subject and sufficient contrast between foreground and background. It fails in low light (below 50 lux), with transparent objects (glass, mesh), or when the subject lacks distinct edges. The dual camera system requires both lenses unobstructed — a smudged telephoto lens causes "Move farther away" errors. For non-compatible subjects, use background blur apps with AI segmentation that work on any photo without depth data.
Faces or plates to hide in your photo?
Drop a photo or video in your browser and the AI auto-blurs faces, license plates, and personal info in seconds.
Upload free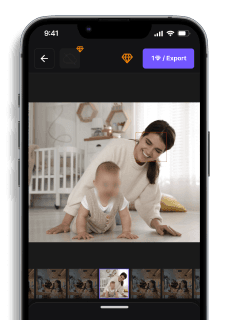
Faces or plates to hide in your photo?
Drop a photo or video in your browser and the AI auto-blurs faces, license plates, and personal info in seconds.
Upload free