If you’re wondering how to screenshot on Chromebook, you’re not alone. Whether you’re using an HP, Lenovo, Dell, or a school-issued Chromebook, knowing the right Chromebook screenshot shortcuts and tools can save you time and frustration.
This guide covers how to take a screenshot on a Chromebook in every way possible — from using keyboard shortcuts to accessing the snipping tool on Chromebook, and even how to screenshot without the Windows key.
Let’s get started.
How to Take a Screenshot on a Chromebook (The Fast Way)
The fastest way to take a screenshot on a Chromebook is by using keyboard shortcuts. Chromebooks have built-in screenshot features similar to the Print Screen key on Windows, but with Chrome OS–specific commands.
Full-Screen Screenshot Shortcut
Shortcut:Ctrl + Show Windows (the rectangle with two lines on the right of your keyboard)
This captures the entire screen instantly. The image will appear as a small thumbnail in the bottom-right corner of your screen — click it to view or edit.
Saved to:
Downloads folder → "My Files" → "Downloads"
Partial Screenshot Shortcut
Shortcut:Ctrl + Shift + Show Windows
This opens a crosshair cursor so you can drag and select a specific area to capture. It’s perfect when you only want part of your screen.
Tip: Want to hide personal data before sharing? Use Blur Photo to quickly blur images online for free, no install needed.
Window Screenshot Shortcut
If you have multiple windows open and only want to capture one:
- Press
Alt + Show Windows - Select the window you want to screenshot.
How to Take a Screenshot on a Chromebook with Keyboard Shortcuts
Here’s a quick reference chart for your convenience:
| Screenshot Type | Shortcut |
|---|---|
| Full Screen | Ctrl + Show Windows |
| Partial Screen | Ctrl + Shift + Show Windows |
| Active Window | Alt + Show Windows |
| Screenshot Menu (Chrome OS 89+) | Shift + Ctrl + Show Windows |
💡 Pro Tip: Chrome OS 89 and newer versions include a built-in Screen Capture Toolbar, which lets you record your screen or take still shots.
How to Screenshot on a Chromebook Without Windows Key
If your Chromebook keyboard doesn’t have a “Show Windows” key (common on detachable or compact devices), you can still take a screenshot without the Windows key:
- Open Quick Settings (bottom-right corner of the screen).
- Click Screen Capture.
- Choose between full, window, or partial screenshot.
Alternatively, press:
- Search + Shift + P (on some newer devices).
Your screenshot will still appear in your Downloads folder.
How to Screenshot on HP, Lenovo & Dell Chromebooks

Different Chromebook brands like HP, Lenovo, and Dell all run Chrome OS — meaning the shortcuts are identical. But some models have slight differences in keyboard layout or trackpad gestures.
How to Screenshot on HP Chromebook
Use the standard shortcut:Ctrl + Show Windows
For touchscreen HP Chromebooks:
- Press and hold Power + Volume Down (like Android devices).
If you want to snip a region, use:Ctrl + Shift + Show Windows
How to Screenshot on Lenovo Chromebook
Lenovo’s detachable keyboards may label “Show Windows” as “F5.”
Try:Ctrl + F5 for full-screenCtrl + Shift + F5 for partial.
How to Screenshot on Dell Chromebook
Dell Chromebooks follow the same pattern:Ctrl + Show Windows for full-screen capture.
If the key doesn’t work, use Screen Capture from Quick Settings.
How to Screenshot on a School Chromebook (With Restrictions)
School-issued Chromebooks often have administrator restrictions that disable shortcuts or downloads. If your device blocks screenshots:
- Ask your IT admin if screenshot capture is disabled.
- Try Shift + Ctrl + Show Windows — some partial captures may still work.
- Use online screen capture extensions approved by your school, such as Nimbus Screenshot.
- Alternatively, use your phone camera to take a photo of your Chromebook screen.
If you can capture images but need to hide personal or class details, BlurMe helps students quickly blur sensitive text or faces in screenshots especially useful when sharing presentations or group work.
How to Use the Snipping Tool on Chromebook
Chromebooks don’t have a “Snipping Tool” like Windows, but Chrome OS’s Screen Capture Tool does the same job — and even better.
How to Access the Snipping Tool on Chromebook
- Press
Shift + Ctrl + Show Windows. - Choose “Screenshot” from the bottom toolbar.
- Select full, partial, or window capture.
- Edit, annotate, or copy it directly to the clipboard.
Or, open it manually:
- Click the Clock in the bottom right corner.
- Select Screen Capture.
💡 If you often take snips for documentation, screenshots, or guides, try editing them online using BlurMe’s Cleanup Pictures Tool to remove unwanted marks or backgrounds easily.
How to Take a Screenshot on Chromebook with Stylus (for Touchscreen Models)
If your Chromebook comes with a stylus (like Pixelbook or Lenovo Duet), capturing screenshots is even more intuitive.
- Tap the Pen icon in the taskbar.
- Select Capture Screen (for full-screen) or Capture Region (for partial).
- Your screenshot saves automatically in Downloads.
Stylus screenshots are great for teachers, artists, or students annotating digital homework.
Where to Find Screenshots on Chromebook
By default, screenshots save to your Downloads folder:
Files > My Files > Downloads
You can move them to:
- Google Drive
- A custom folder
- Or upload directly to an editing tool like BlurMe to blur images online or pixelate pictures.
If your screenshots aren’t saving, check:
- Storage permissions
- Available disk space
- Or Chrome OS updates.
How to Edit or Blur Your Chromebook Screenshots Online
After taking your screenshot, you might want to crop, resize, or blur sensitive details. Here’s how:
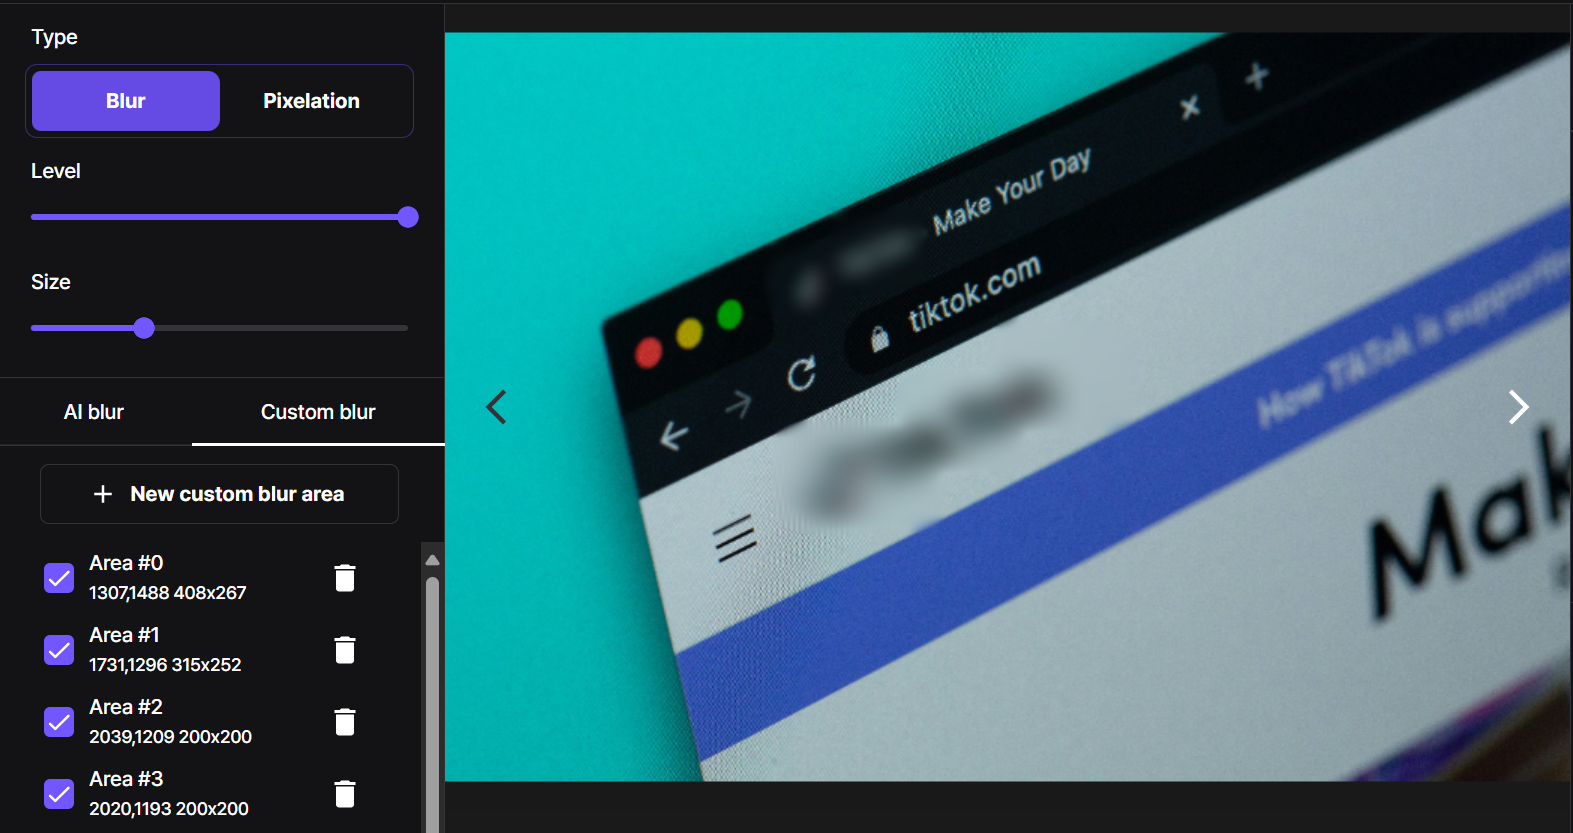
How to Blur a Screenshot Online
- Visit BlurMe Studio .
- Upload your screenshot.
- Choose AI Blur for automatic face or text detection, or Custom Blur to manually hide areas.
- Adjust intensity and download your clean image.
This is perfect for teachers, students, and professionals who need to protect private info before sharing.
Extra Chromebook Screenshot Tips
Copy Instead of Save:
Hold Ctrl + Shift + Show Windows, then press Ctrl + C to copy the screenshot directly to your clipboard.
Change Screenshot Location:
Go to Files > Settings > Change where files are saved.
Take Scrolling Screenshots:
Use Chrome extensions like FireShot to capture full webpages.
Resize or Compress Screenshots:
Try:
- Resize Image to 20KB
- Reduce Image in KB
- Resize Image to 100KB
for quick web optimization.
Chromebook Screenshot Troubleshooting
If your shortcuts don’t work:
- Restart your Chromebook.
- Ensure Chrome OS is up-to-date.
- Check that screenshot permissions aren’t disabled by an administrator.
- Try Screen Capture from the Quick Settings panel.
FAQ: Chromebook Screenshot Questions
How do I take a screenshot on a Chromebook without a keyboard?
Use the Screen Capture tool from the Quick Settings menu or the stylus menu on touchscreen models.
Where are my Chromebook screenshots saved?
All screenshots are stored in your Downloads folder by default.
Can I edit or blur my Chromebook screenshots?
Yes — use BlurMe’s Blur Image Online tool to blur text, blur faces, or areas instantly.
What’s the snipping tool shortcut on Chromebook?
Press Shift + Ctrl + Show Windows to open Chrome OS’s built-in snipping tool.
How can I remove text or marks from my screenshot?
Try Remove Text from Images or Cleanup Pictures for fast edits.
Can I remove a watermark from a Chromebook screenshot?
You can use Remove TikTok Watermark or similar tools to clean up your visuals before sharing.
If you’re exploring more Chromebook and PC tips, check out our guides on How to Open Unknown File and Refresh Shortcut Key: How to Instantly Refresh Your Computer or Laptop to boost your productivity.
Final Thoughts
Now you know exactly how to screenshot on Chromebook, whether you’re on an HP, Lenovo, Dell, or school device. From full-screen to partial snips and stylus captures, Chrome OS gives you all the tools you need — and if you want to edit or protect your screenshots, BlurMe Face Blur makes it effortless to blur, resize, or clean images online in seconds.
Master these shortcuts, and you’ll never fumble for the Print Screen key again.