How to Blur a Face in a Picture (3 Fast Methods)
Maya Chen — Tech Writer & Privacy Advocate Part of: Blur Photo Complete Guide: Methods, Tools & Best Practices (2026)Read the complete guide →
How to Blur a Face in a Picture (3 Fast Methods)
Part of the General Image Blur Tools & Apps guide
You just took the perfect group photo, but one person in the background is checking their phone and ruins the composition — now you need to blur that distraction before posting. Manually selecting and blurring specific areas in traditional photo editors means opening desktop software, navigating through menus, adjusting brush sizes, and carefully painting over regions frame by frame. That's 3 minutes and 5 steps per image — multiply that by a dozen event photos and you've lost half an hour to repetitive clicking.
The frustration compounds when you're working on mobile or need to protect privacy by obscuring faces, license plates, or sensitive documents in shared photos. Miss one detail and you've exposed information you can't take back. Desktop software like Photoshop demands a learning curve, while free mobile apps plaster watermarks over your edits or limit blur intensity.
Modern blur tools now handle the entire blur picture workflow automatically — upload, detect regions, and download the edited image in under 30 seconds. Whether you need to blur faces for GDPR compliance, hide background clutter for professional product shots, or pixelate sensitive information in screenshots, the right tool eliminates manual selection entirely while giving you full control over blur intensity and effect style.
Common Approaches to Blur Picture
You can blur a picture in three main ways: mobile apps for quick edits on the go, desktop software for precision control, or online editors that work in any browser. Each method suits different needs—mobile apps work best for social media posts, desktop software handles professional workflows, and online tools require zero installation.
Mobile Apps (iOS/Android)
Snapseed and Point Blur are the go-to free apps for blurring pictures on smartphones. Both offer selective blur tools that let you control exactly which parts of your photo get blurred.
Open Snapseed, tap Tools → Lens Blur. The app automatically applies a depth effect that mimics portrait mode—foreground stays sharp while the background blurs. Drag the blur strength slider to adjust intensity (0-100 scale). Tap the circular icon to switch blur shape between linear, radial, or elliptical patterns. For face privacy, use Selective tool instead: tap a face to place a control point, then swipe down to access the blur slider.
Point Blur works differently—it treats blur as a brush. Import your photo, select Blur mode, and paint directly over faces or sensitive information with your finger. Adjust brush size with the slider (10-200 pixels). Switch to Pixelate or Mosaic effect for stronger privacy protection where facial features become completely unrecognizable. Export at full resolution when done.
Mobile apps limit you to touchscreen precision. Blurring small details like license plates or text requires zooming in repeatedly. Batch processing isn't available—you edit one photo at a time.
Desktop Software (GIMP)
GIMP is free image editing software that runs on Windows, Mac, and Linux. It offers gaussian blur, motion blur, and pixelate filters with pixel-level control.
Download GIMP from gimp.org and install it. Open your photo with File → Open. Press F to activate the Free Select tool (lasso), then draw around the face or area you want to blur—this creates a selection boundary. Select Filters → Blur → Gaussian Blur. This averages pixel values in a bell curve pattern for natural-looking blur, unlike box blur which creates blocky artifacts. Set the blur radius (try 15-30 pixels for faces)—higher values create stronger blur but can look artificial above 50. Click OK to apply, then press Ctrl+Shift+A (Cmd+Shift+A on Mac) to deselect.
For sensitive information like medical records or children's photos, use Filters → Blur → Pixelize instead. Set pixel size to 10-20 for complete anonymization where original features cannot be reconstructed. This meets privacy protection requirements for GDPR compliance when redacting photos.
GIMP has a steep learning curve. New users spend 10-15 minutes learning selection tools before they can blur anything. The interface feels cluttered compared to modern photo editors.
Online Editors (No Download Required)
Canva and Pixlr let you blur pictures directly in your browser. Both work on any device without installation—useful for shared computers or quick edits at work.
Go to canva.com and click Create a design → Edit photo. Upload your image, then click Edit image in the toolbar. Select Blur from the adjustment menu. Drag the blur intensity slider (0-100 scale) to control strength—30-50 works for background blur, 80-100 for privacy protection. Canva applies blur to the entire photo by default. For selective blur, click Effects → Blur → Brush tool, then paint over specific areas. The brush size adjusts with the slider (small for faces, large for backgrounds).
Pixlr offers more control. Open pixlr.com/editor, upload your photo, and select the Blur tool from the left toolbar. Choose between Gaussian Blur (smooth, natural), Motion Blur (directional streaks), or Zoom Blur (radial effect from center). Adjust brush hardness (0-100) and strength (1-10). Paint directly over faces or sensitive information—the blur applies only where you brush. Export as JPG or PNG when finished.
Online editors compress your photo during upload. A 5MB original may export as 2MB with slightly reduced image quality. Processing happens on their servers, so upload speeds depend on your internet connection. Free versions add watermarks to exports—Canva requires a paid account ($12.99/month) for watermark-free downloads.
Desktop Software Advanced (Photoshop)
Adobe Photoshop costs $54.99/month but offers professional-grade blur tools that desktop alternatives can't match. Use it when image quality matters—corporate headshots, legal documents, or photos for publication.
Open your photo in Photoshop, then press L to activate the Lasso tool. Draw around the face or area to blur, creating a selection. Go to Filter → Blur Gallery → Field Blur. Click inside the selected area to place a blur pin, then drag the blur slider (0-500 pixels). Place multiple pins to vary blur intensity across the selection—stronger blur on the face center, lighter on edges for natural falloff. The preview updates in real-time as you adjust.
For batch processing multiple photos, use File → Automate → Batch. Record an action that applies your blur settings, then run it on an entire folder. This processes 100 photos in under 5 minutes versus 30+ minutes of manual editing.
Photoshop's blur algorithms preserve edge detail better than free tools. Lens Blur simulates camera depth of field with realistic bokeh effects. Smart Blur detects edges automatically and blurs only smooth areas, keeping facial outlines sharp while obscuring features—useful for artistic portrait mode effects.
The subscription cost blocks casual users. You're paying $660/year for features most people use once a month. Cheaper alternatives like Affinity Photo ($69.99 one-time) offer similar blur tools without recurring fees.
Blur Pictures with AI (Blur.me)
You just shot 50 photos at a crowded event — faces everywhere. Photoshop's manual selection would take 2+ hours.
Drop your images into Blur.me — AI scans all 50 files and flags every face in ~2.5 minutes total (~3 seconds per photo).
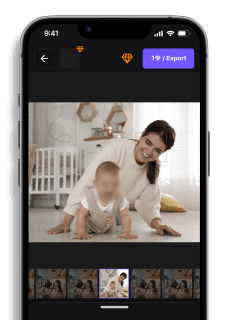
Click faces to toggle blur on/off — keep your subject sharp, anonymize the crowd. Blue bounding boxes show exactly what's detected.
Download the batch — all 50 photos export at original resolution with irreversible blurring (pixel data permanently destroyed for GDPR compliance).
When 50 event photos contain hundreds of faces, Photoshop's 2+ hour manual workflow becomes a bottleneck. Blur.me processes the same batch in ~2.5 minutes — AI flags every face automatically, you click to toggle blur on/off, then export all 50 at original resolution with irreversible GDPR-compliant blurring.
Faces or plates to hide in your photo?
Upload and the AI blurs them automatically in seconds.
Legal Considerations: When You Must Blur Pictures
GDPR compliance in the EU requires blurring faces in photos before publishing them online if individuals are identifiable and haven't given explicit consent. Security camera footage shared publicly must anonymize bystanders. Blur intensity matters legally — light blur that still reveals identity doesn't satisfy GDPR requirements. Use pixelate or heavy gaussian blur (radius 30+) to ensure faces are unrecognizable.
HIPAA regulations in healthcare mandate redacting patient faces in medical photos before using them for research or education. A 2023 case saw a hospital fined $4.3 million for sharing unredacted patient images. Irreversible blur methods (destructive editing) are required — Photoshop's Smart Filters don't qualify because they're non-destructive.
Consent requirements vary by jurisdiction. In Germany, photographing strangers in public requires consent before publication. In the US, public photography is generally legal, but commercial use (ads, product packaging) requires model releases. When in doubt, blur faces to avoid legal disputes.
Common Mistakes When Blurring Pictures
Mistake 1: Under-blurring faces — Light blur (radius <15px) still reveals facial features. Eyes, nose shape, and skin tone remain identifiable. Solution: Use minimum 25px gaussian blur or 20px pixelate blocks for effective anonymization.
Mistake 2: Forgetting reflections — Blurring a person's face but leaving their reflection visible in a mirror or window defeats the purpose. Always check for reflective surfaces and blur those areas too.
Mistake 3: Ignoring metadata — EXIF data in photos contains GPS coordinates, timestamps, and camera settings. Blurring faces doesn't remove metadata. Use online EXIF removers or Blur.me's privacy mode (strips metadata automatically) before sharing.
Mistake 4: Using non-destructive blur — Photoshop Smart Filters and adjustment layers can be reversed, exposing the original unblurred image. For legal compliance, flatten layers and export as a new file to make blur permanent.
Mistake 5: Blurring too much — Over-blurring destroys image context. If you blur an entire crowd scene to hide one person, the photo loses its purpose. Use selective blur to anonymize specific individuals while preserving the overall scene.
Batch Blur: Processing 100+ Photos Efficiently
Photoshop Actions automate repetitive blur tasks. Record an Action (Window → Actions → Create New Action) while applying blur to one photo, then run it on an entire folder via File → Automate → Batch. Limitation: requires manual face selection per photo unless you use third-party face detection plugins.
GIMP scripting (Script-Fu or Python-Fu) enables batch processing but requires programming knowledge. Pre-written scripts exist online for bulk blur, but setup takes 30+ minutes for first-time users.
Blur.me batch mode handles 100+ photos simultaneously with AI face detection on all images. Upload a folder, AI scans every photo, apply blur settings once, download all processed images as a zip file. Fastest option for bulk privacy redaction without scripting.
Lightroom Classic (part of Adobe Photography Plan, $9.99/month) doesn't include blur tools but integrates with Photoshop. Use Lightroom to organize and export photos, then process them in Photoshop via Edit In → Photoshop.
Faces or plates to hide in your photo?
Drop a photo or video in your browser and the AI auto-blurs faces, license plates, and personal info in seconds.
Upload free